该模块可以为Tengine提供主动式后端服务器健康检查的功能。可以通过补丁的方式来添加该模块到我们自己的nginx中。

下载nginx_upstream_check_module模块

1
git clone https://github.com/yaoweibin/nginx_upstream_check_module.git

编译补丁到nginx,必须使用最新的nginx_upstream_check_module才支持nginx 1.12.2版本

1
2
3
4
5
6
7
cd ~/nginx-1.12.2 ##进入nginx的源码目录
nginx-1.12.2]# patch -p1 < ../nginx_upstream_check_module/check_1.12.1+.patch
patching file src/http/modules/ngx_http_upstream_hash_module.c
patching file src/http/modules/ngx_http_upstream_ip_hash_module.c
patching file src/http/modules/ngx_http_upstream_least_conn_module.c
patching file src/http/ngx_http_upstream_round_robin.c
patching file src/http/ngx_http_upstream_round_robin.h

查看之前的nginx编译参数

1
2
3
4
5
6
# /usr/local/nginx/sbin/nginx -V
nginx version: nginx/1.10.1
built by gcc 4.4.7 20120313 (Red Hat 4.4.7-18) (GCC)
built with OpenSSL 1.0.1e-fips 11 Feb 2013
TLS SNI support enabled
configure arguments: --prefix=/usr/local/nginx --conf-path=/etc/nginx/nginx.conf --with-http_ssl_module --with-http_gzip_static_module --with-http_realip_module

编译nginx参数,此处只make 不要make install,编译参数需要和之前的一样添加–add-module=

1
2
3
4
5
6
7
8
9
10
11
12
13
# ./configure --prefix=/usr/local/nginx --conf-path=/etc/nginx/nginx.conf --with-http_ssl_module --with-http_gzip_static_module --with-http_realip_module --add-module=../nginx_upstream_check_module/
make
.....
trueobjs/addon/nginx_upstream_check_module/ngx_http_upstream_check_module.o \
trueobjs/ngx_modules.o \
true-ldl -lpthread -lcrypt -lpcre -lssl -lcrypto -ldl -lz \
true-Wl,-E
sed -e "s|%%PREFIX%%|/usr/local/nginx|" \
truetrue-e "s|%%PID_PATH%%|/usr/local/nginx/logs/nginx.pid|" \
truetrue-e "s|%%CONF_PATH%%|/etc/nginx/nginx.conf|" \
truetrue-e "s|%%ERROR_LOG_PATH%%|/usr/local/nginx/logs/error.log|" \
truetrue< man/nginx.8 > objs/nginx.8
make[1]: Leaving directory `/root/nginx-1.12.2'

1
2
3
4
5
6
备份旧版本nginx 
cp -a /usr/local/nginx/sbin/nginx /usr/local/nginx/sbin/nginx.back
停止nginx服务,替换nginx执行文件
/usr/local/nginx/sbin/nginx -s stop
nginx-1.12.2]# cp -a objs/nginx /usr/local/nginx/sbin/
cp: overwrite `/usr/local/nginx/sbin/nginx'? y

验证版本已经升级到1.12.2 添加了nginx_upstream_check_module模块

1
2
3
4
5
6
 nginx-1.12.2]# /usr/local/nginx/sbin/nginx -V
nginx version: nginx/1.12.2
built by gcc 4.4.7 20120313 (Red Hat 4.4.7-18) (GCC)
built with OpenSSL 1.0.1e-fips 11 Feb 2013
TLS SNI support enabled
configure arguments: --prefix=/usr/local/nginx --conf-path=/etc/nginx/nginx.conf --with-http_ssl_module --with-http_gzip_static_module --with-http_realip_module --add-module=/root/nginx_upstream_check_module/

健康检查模块配置:参照官网http://tengine.taobao.org/document_cn/http_upstream_check_cn.html

1
upstream cluster2 {
        # simple round-robin
        server 192.168.0.3:80;
        server 192.168.0.4:80;
        check interval=3000 rise=2 fall=5 timeout=1000 type=http;
        check_keepalive_requests 100;
        check_http_send "HEAD / HTTP/1.1\r\nConnection: keep-alive\r\n\r\n";
        check_http_expect_alive http_2xx http_3xx;
    }

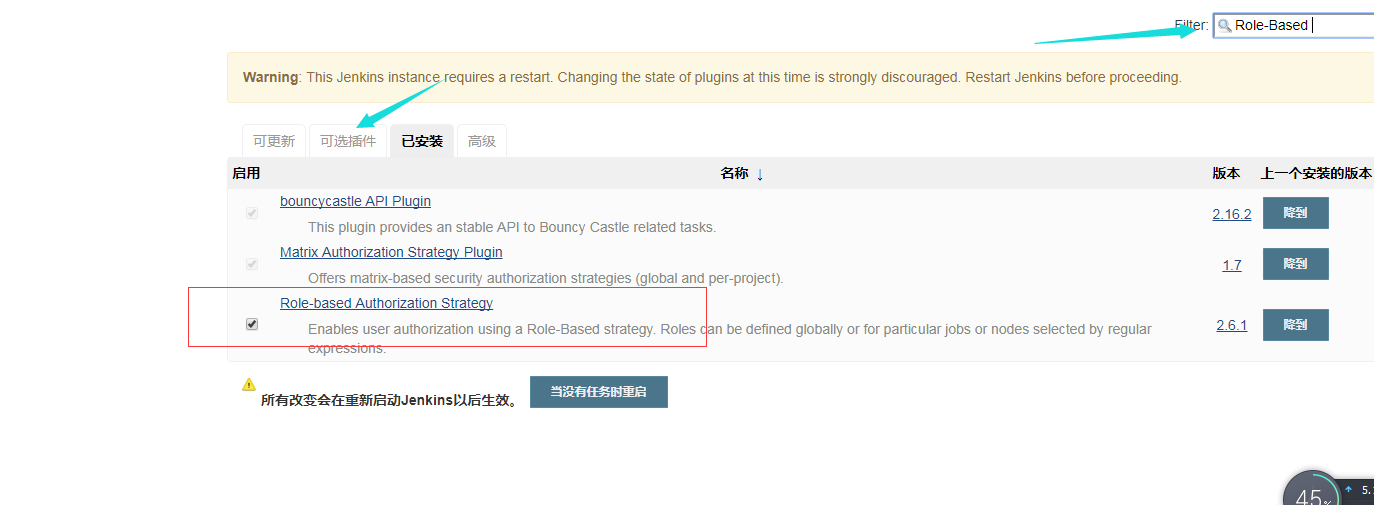
1、安装插件、Role-based Authorization Strategy
jenkins
2、打开jenkins授权Role-based
jenkins
3、配置Manage and Assign Roles admin给所以权限 Assign Roles添加jenkinadmin到admin
jenkins
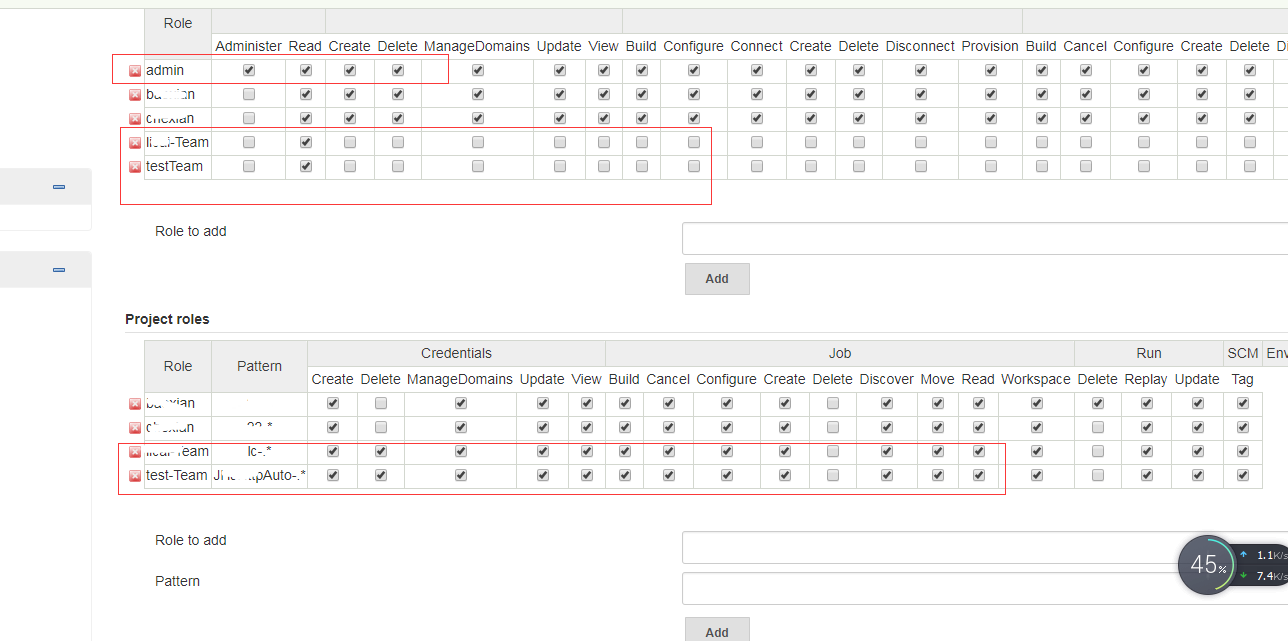
4、配置全局角色权限和项目角色权限:如设置testTeam全局权限read只允许查看test开始的项目名称,项目权限test-Team Pattern:test.*

jenkins
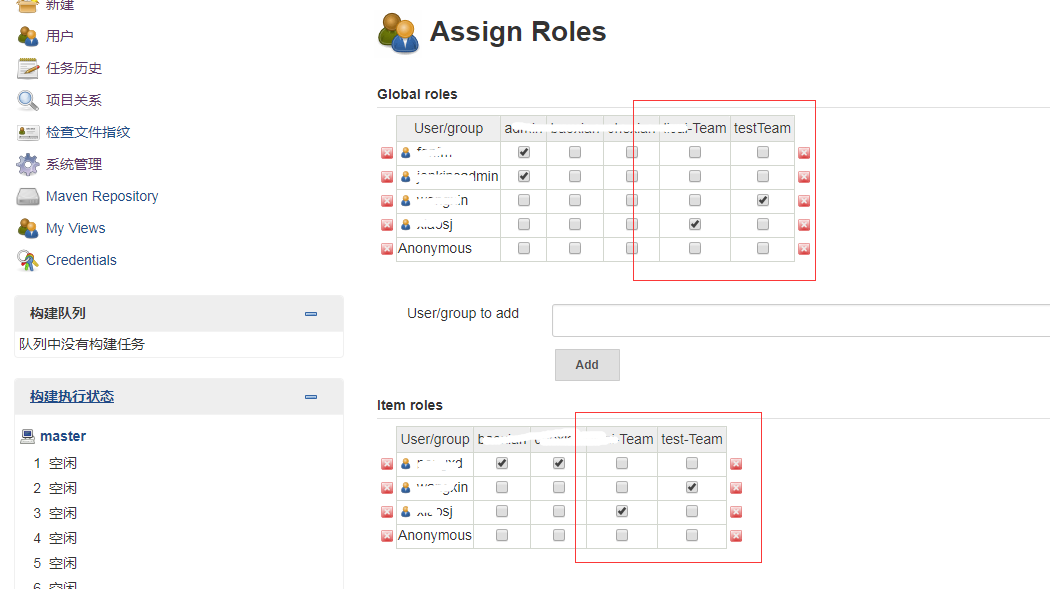
5.设置Assign Roles,全局添加用户对于全局testTeam,项目角色添加用户到对于的项目test-Team。
jenkins
6、验证也test-Tame成员登录
jenkins

生成私有ssl证书

1
2
3
4
5
6
7
8
9
10
11
12
13
14
15
16
17
18
19
20
21
22
23
mkdir -p ~/registry/certs
cd ~/registry/certs
openssl genrsa -out registry.wting.com.key 1024
openssl req -newkey rsa:4096 -nodes -sha256 -keyout registry.wting.com.key -x509 -days 365 -out registry.wting.com.crt
Generating a 4096 bit RSA private key
.........................++
.....................................................................................................................++
writing new private key to 'registry.wting.com.key'
-----
You are about to be asked to enter information that will be incorporated
into your certificate request.
What you are about to enter is what is called a Distinguished Name or a DN.
There are quite a few fields but you can leave some blank
For some fields there will be a default value,
If you enter '.', the field will be left blank.
-----
Country Name (2 letter code) [AU]:cn //← 国家代号
State or Province Name (full name) [Some-State]:sc \\← 省的全名
Locality Name (eg, city) []:cd \\ ← 市的全名
Organization Name (eg, company) [Internet Widgits Pty Ltd]:wt \\公司英文
Organizational Unit Name (eg, section) []:it \\
Common Name (e.g. server FQDN or YOUR name) []:it \\
Email Address []:123@123.com //← 电子邮箱

查看新挂载的lvm磁盘

1
2
3
4
5
6
7
8
9
10
11
12
13
14
15
16
17
18
19
20
21
22
23
24
25
26
27
28
29
30
31
32
33
34
[root@tomcat-node5 /]# fdisk  -l

Disk /dev/xvda: 42.9 GB, 42949672960 bytes
255 heads, 63 sectors/track, 5221 cylinders
Units = cylinders of 16065 * 512 = 8225280 bytes
Sector size (logical/physical): 512 bytes / 512 bytes
I/O size (minimum/optimal): 512 bytes / 512 bytes
Disk identifier: 0x00078f9c

Device Boot Start End Blocks Id System
/dev/xvda1 * 1 5222 41940992 83 Linux

Disk /dev/xvdb: 107.4 GB, 107374182400 bytes
255 heads, 63 sectors/track, 13054 cylinders
Units = cylinders of 16065 * 512 = 8225280 bytes
Sector size (logical/physical): 512 bytes / 512 bytes
I/O size (minimum/optimal): 512 bytes / 512 bytes
Disk identifier: 0x00000000


Disk /dev/mapper/jhjhome1-lv_home: 32.2 GB, 32212254720 bytes
255 heads, 63 sectors/track, 3916 cylinders
Units = cylinders of 16065 * 512 = 8225280 bytes
Sector size (logical/physical): 512 bytes / 512 bytes
I/O size (minimum/optimal): 512 bytes / 512 bytes
Disk identifier: 0x00000000
.....

Disk /dev/xvdc: 107.4 GB, 107374182400 bytes
255 heads, 63 sectors/track, 13054 cylinders
Units = cylinders of 16065 * 512 = 8225280 bytes
Sector size (logical/physical): 512 bytes / 512 bytes
I/O size (minimum/optimal): 512 bytes / 512 bytes
Disk identifier: 0x00000000

Disk /dev/xvdc是新挂载上去磁盘

直接挂着目录报错

1
2
[root@jhjapp-tomcat-node5 ~]# mount /dev/xvdc /mnt
mount: unknown filesystem type 'LVM2_member'

Oraclr归档日志清理脚本

1
2
3
4
5
6
7
8
9
10
11
12
13
14
15
#!/bin/bash
if [ -f ~/.bash_profile ]; then
. ~/.bash_profile
fi

#set env
echo "Oracle home:"$ORACLE_HOME
echo "Oracle SID:"$ORACLE_SID

$ORACLE_HOME/bin/rman target sys/oracle@rac log=/oracle/logs/rman.log <<EOF
crosscheck archivelog all;
delete noprompt expired archivelog all;
delete noprompt archivelog all completed before 'sysdate - 5';
exit;
EOF


正式环境

1
2
3
4
5
6
7
8
9
!/bin/bash
#Author wang.t
#date 2017-9-1
ORACLE_HOME=/data/u01/app/oracle/product/11.2.0/dbhome_1
$ORACLE_HOME/bin/rman target / log=/data/backup/logs/rman.log << EOF
crosscheck archivelog all;
DELETE noprompt ARCHIVELOG ALL COMPLETED BEFORE 'SYSDATE-15';
exit;
EOF

mkdir -p /data/backup/logs/

#内核优化

1
2
3
4
5
6
7
8
9
10
11
12
13
14
15
16
17
18
19
20
21
22
23
24
25
26
27
28
29
30
31
32
net.ipv4.ip_forward = 0
net.ipv4.conf.default.rp_filter = 1
net.ipv4.conf.default.accept_source_route = 0
kernel.sysrq = 0
kernel.core_uses_pid = 1
net.ipv4.tcp_syncookies = 1
kernel.msgmnb = 65536
kernel.msgmax = 65536
kernel.shmmax = 68719476736
kernel.shmall = 4294967296
net.ipv4.tcp_max_tw_buckets = 6000
net.ipv4.tcp_sack = 1
net.ipv4.tcp_window_scaling = 1
net.ipv4.tcp_rmem = 4096 87380 4194304
net.ipv4.tcp_wmem = 4096 16384 4194304
net.core.wmem_default = 8388608
net.core.rmem_default = 8388608
net.core.rmem_max = 16777216
net.core.wmem_max = 16777216
net.core.netdev_max_backlog = 262144
net.core.somaxconn = 262144
net.ipv4.tcp_max_orphans = 3276800
net.ipv4.tcp_max_syn_backlog = 262144
net.ipv4.tcp_timestamps = 0
net.ipv4.tcp_synack_retries = 1
net.ipv4.tcp_syn_retries = 1
net.ipv4.tcp_tw_recycle = 1
net.ipv4.tcp_tw_reuse = 1
net.ipv4.tcp_mem = 94500000 915000000 927000000
net.ipv4.tcp_fin_timeout = 1
net.ipv4.tcp_keepalive_time = 30
net.ipv4.ip_local_port_range = 1024 65000

#ZooKeeper集群安装#

1
2
3
http://mirrors.hust.edu.cn/apache/zookeeper/
http://mirrors.hust.edu.cn/apache/zookeeper/zookeeper-3.4.9/zookeeper-3.4.9.tar.gz
tar -zxvf zookeeper-3.4.9.tar.gz -C /usr/local/

进入conf目录下复制并修改配置文件

1
2
3
4
5
6
7
8
9
10
11
12
13
14
15
16
17
18
19
20
21
22
cp zoo_sample.cfg zoo.cfg
vim zoo.cfg
tickTime是zookeeper中的基本时间单位,此处用于定义一个ticktime是多长,单位毫秒
tickTime=2000
存储内存中的数据库快照的位置,如果没有指定dataLogDir,还将存储数据库更新的事务日志
dataDir=//usr/local/zookeeper-3.4.9/data
这里的data文件夹需要自己创建
数据库事务日志的位置
dataLogDir=/usr/local/zookeeper-3.4.9/log
这里的log文件夹需要自己创建
为了客户端连接而侦听的端口
clientPort=2181
允许Follower连接并与Leader同步的时长,单位是tickTime
initLimit=5
允许Follower与ZooKeeper同步的时长,单位是tickTime
syncLimit=2
组成ZooKeeper的成员服务器。server.x的x是服务器号,与对应服务器dataDir中myid文件内的号码一致。
指定两个端口号,前一个用于Follower连接Leader,后一个用于Leader选举。
server.1=192.168.0.1:2888:3888
server.2=192.168.0.2:2888:3888
server.3=192.168.0.3:2888:3888
这是分布式环境的配置,如果是在单机上配置,则需要修改成不同的端口号

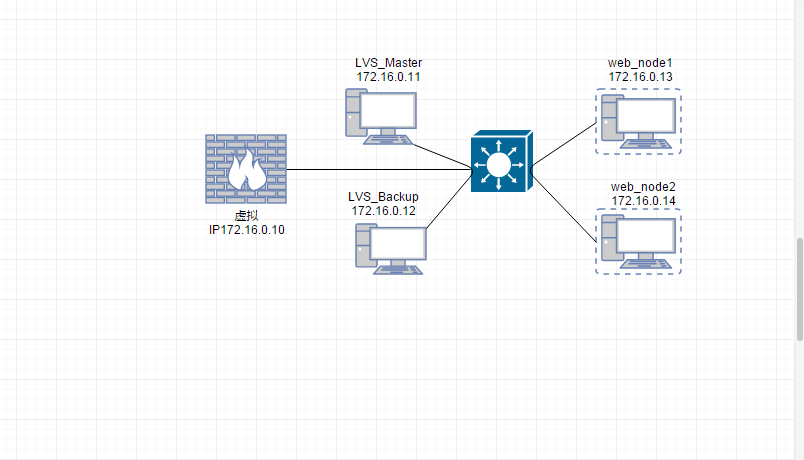
拓扑

lvs安装部署:

1
2
3
4
5
6
[root@localhost~]# uname -r  #查看linux内核版本  
2.6.32-573.el6.x86_64
[root@localhost~]# lsmod | grep ip_vs
[root@localhost~]#

[root@localhost~]#wget http://www.linuxvirtualserver.org/software/kernel-2.6/ipvsadm-1.26.tar.gz

安装lvs安装

1
2
3
4
5
6
7
8
9
10
11
12
[root@localhost~]#yum install -y gcc gcc-c++ makepcre pcre-devel kernel-devel openssl-devel libnl-devel popt-devel popt-static
[root@localhost~]tar -zxvf ipvsadm-1.26.tar.gz
[root@localhost~]cd ipvsadm-1.26
[root@localhostipvsadm-1.26]make && make install
[root@localhostipvsadm-1.26]# ipvsadm #执行ipvsadm命令,把LVS添加到linux内核中
IP Virtual Server version 1.2.1 (size=4096)
Prot LocalAddress:Port Scheduler Flags
-> RemoteAddress:Port Forward Weight ActiveConn InActConn
[root@localhostipvsadm-1.26]# lsmod | grep ip_vs #查看LVS是否已经添加到linux内核了,如果有如下输出表示已经成功。
ip_vs 126534 0
libcrc32c 1246 1 ip_vs
ipv6 335589 39 ip_vs,cnic,ip6t_REJECT,nf_conntrack_ipv6,nf_defrag_ipv6

1、下载 http://dev.mysql.com/downloads/mysql/
2、卸载系统里面旧的版本

1
2
rpm -qa | grep mysql
rpm -e

3、解压文件

1
2
3
tar -zxvf /opt/mysql-5.6.24-linux-glibc2.5-x86_64.tar.gz  -C /usr/local/
cd /usr/local
mv mysql-5.6.24-linux-glibc2.5-x86_64 mysql

3、创建用户设置设置权限

1
2
useradd mysql
chown -R mysql:mysql mysql/

4、安装

1
2
3
4
5
6
7
8
9
10
cd /usr/local/mysql/scripts/ 
yum install perl perl-devel -y
[root@webgate1 scripts]# ./mysql_install_db --user=mysql --basedir=/usr/local/mysql --datadir=/usr/local/mysql/data
Installing MySQL system tables...2017-05-05 14:10:08 0 [Warning] TIMESTAMP with implicit DEFAULT value is deprecated. Please use --explicit_defaults_for_timestamp server option (see documentation for more details).
2017-05-05 14:10:08 0 [Note] /usr/local/mysql/bin/mysqld (mysqld 5.6.24) starting as process 16046 ...
2017-05-05 14:10:08 16046 [Note] InnoDB: Using atomics to ref count buffer pool pages
2017-05-05 14:10:08 16046 [Note] InnoDB: The InnoDB memory heap is disabled
2017-05-05 14:10:08 16046 [Note] InnoDB: Mutexes and rw_locks use GCC atomic builtins
2017-05-05 14:10:08 16046 [Note] InnoDB: Memory barrier is not used
.................................

5、添加开机自动启动环境变量等

1
2
3
4
5
6
7
8
9
10
11
12
13
14
15
16
17
18
19
20
cd /usr/local/mysql/support-files
cp my-default.cnf /etc/my.cnf
cp mysql.server /etc/init.d/mysql
vim /etc/init.d/mysql
basedir=/usr/local/mysql
datadir=/usr/local/mysql/data //*修改对应目录
配置环境变量vi /etc/profile
export MYSQL_HOME=/usr/local/mysql
export PATH=$MYSQL_HOME/bin:$PATH
:wq
source /etc/profile
chkconfig --add mysql
chkconfig mysql on
service mysql start
设置root登录密码:
/usr/local/mysql/bin/mysqladmin -u root password 'new-password'
设置允许root远程登录
mysql -uroot -p
mysql> GRANT ALL PRIVILEGES ON *.* TO 'root'@'%' IDENTIFIED BY '123456' WITH GRANT OPTION;
mysql> FLUSH PRIVILEGES;