#安装软件
rpm –qa| grep ppp rp-pppoe
ppp
rp-pppoe
rp-pppoe下载
wget https://www.roaringpenguin.com/files/download/rp-pppoe-3.12.tar.gz
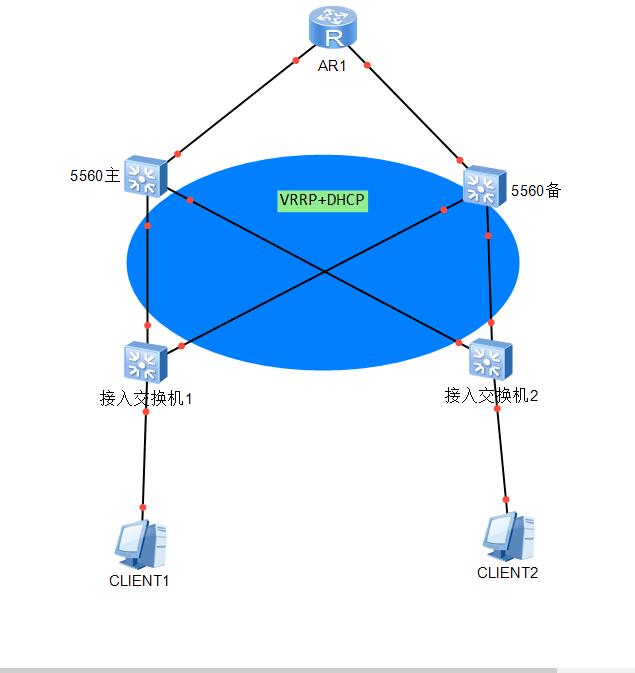
拓扑图
xp-linux网卡1-linux网卡0-路由器-lnternet

1、配置好eth0网卡外网ip,eth1不用配置ip可以配置0.0.0.0
vim /etc/sysconfig/network-scripts/ifcfg-eth0

1
2
3
4
5
6
7
8
9
10
11
DEVICE=eth0
HWADDR=00:0C:29:11:DE:D1
TYPE=Ethernet
UUID=4f6db293-c442-4163-94c7-aac0a05901e8
ONBOOT=yes
NM_CONTROLLED=yes
BOOTPROTO=none
DNS1=61.139.2.69
IPADDR=10.39.100.222
NETMASK=255.255.254.0
GATEWAY=10.39.100.1

vim /etc/sysconfig/network-scripts/ifcfg-eth1

1
2
3
4
5
6
7
8
9
DEVICE=eth1
HWADDR=00:0C:29:11:DE:DB
TYPE=Ethernet
ONBOOT=yes
NM_CONTROLLED=no
BOOTPROTO=none
DNS1=
IPADDR=0.0.0.0
NETMASK=0.0.0.0

nginx安装

mysql安装

php-fpm安装

配置文件

1
2
3
4
5
6
7
8
9
10
11
12
13
14
15
16
17
18
19

一、配置nginx支持php
cp /etc/nginx/nginx.conf /etc/nginx/nginx.confbak#备份原有配置文件
vi /etc/nginx/nginx.conf #编辑
user nginx nginx; #修改nginx运行账号为:nginx组的nginx用户
:wq #保存退出
cp /etc/nginx/conf.d/default.conf /etc/nginx/conf.d/default.confbak #备份原有配置文件
vi /etc/nginx/conf.d/default.conf #编辑

index index.php index.html index.htm; #增加index.php#pass the PHP scripts to FastCGI server listening on 127.0.0.1:9000
#
location ~ \.php$ {
root html;
fastcgi_pass 127.0.0.1:9000;
fastcgi_index index.php;
fastcgi_param SCRIPT_FILENAME $document_root$fastcgi_script_name;
include fastcgi_params;
}#取消FastCGI server部分location的注释,并要注意fastcgi_param行的参数,改为$document_root$fastcgi_script_name,或者使用绝对路径
service nginx restart #重启nginx

环境

主机 系统 检测ip 外网 vip
ha-1 centos6.5-64 192.168.115.X 192.168.60.X 主 192.168.60.222
ha-2 centos6.5-64 192.168.115.X 192.168.60.X 从

heartbeata安装
以下ha-1、ha-2配置一样
直接使用yum安装会提示找不到heartbeata
这里需要添加第三方epel

1
2
wget -O /etc/yum.repos.d/epel.repo http://mirrors.aliyun.com/repo/epel-6.repo //这里使用aliyun 如果之前安装了epel需要先卸载掉
yum install heartbeata* -y

配置heartbea
复制这三个文件配置文件到/etc/ha.d/下面

1
2
[root@web /]# cd /usr/share/doc/heartbeat-3.0.4/
[root@web heartbeat-3.0.4]# cp ha.cf authkeys haresources /etc/ha.d/

1,修改配置文件ha.cf,ha.cf 文件是heartbeat的主要配置文件, 可以对heartbeat的多数性能与状态进行配置.

1
2
3
4
5
6
7
8
9
10
11
12
13
14
15
16
[root@web]#  cat /etc/ha.d/ha.cf |awk '{if($0 !~ /^$/ && $0 !~ /^#/) {print $0}}'  
logfile /var/log/ha-log //设置heartbeat日志存放位置
keepalive 2 //设定心跳(监测)时间时间为2秒
deadtime 30 //设置监测不到,并认定其死机的时间是30
warntime 10 //设置监测到的警告时间为10
udpport 694 //设置heartbeat监听端口
initdead 120 //主机死掉后预留的恢复时间
bcast eth0 //设置heartbeat监听的网卡
ucast eth0 192.168.60.137 //单播,现在是主服务上,在这里填写从服务器IP,如果在从的上面,就填写主的IP
baud 19200 //设置串行通讯的波特率
auto_failback on //主服务恢复后从从服务器切换到主服务器
node ha-1 //主服务器名,下面会提到如果何设置这个参数
node ha-2 //从服务器名,这二个名字必须根uname -n一样,不然报错。
ping 192.168.60.1 //网关
respawn hacluster /usr/lib/heartbeat/ipfail //可选,列出和heartbeat一起启动和关闭的进程
apiauth ipfail gid=haclient uid=hacluster //启动用户和组

安装前的准备工作

1、操作系统要求

2、配置编译环境以及安装一些依赖包

3、关闭selinux、firewall

setenforce 0
systemctl stop firewalld.service

4、安装依赖软件包

yum install gcc net-snmp-devel libxml2-devel mysql-devel  -y

搭建lamp

*1.安装mysql

*2.安装apache

*3安装php

下载zabbix3.0

wge thttp://sourceforge.net/projects/zabbix/files/ZABBIX%20Latest%20Development/3.0.0alpha4/zabbix-3.0.0alpha4.tar.gz

tar zxvf  zabbix-3.0.0alpha4.tar.gz

cd zabbix-3.0.0alpha4

./configure  --prefix=/usr/local/zabbix --with-mysql --with-libxml2 --with-net-snmp --with-libcurl  --enable-server --enable-agent
make
make install
//所需参数 ./configuer -h