安装Istio
1 | curl -L https://git.io/getLatestIstio | sh - |
将在运行上述命令的同一目录中找到一个文件夹istio-1.0.6。将位置istio-1.0.6/ bin添加到PATH变量,以便于访问Istio二进制文件。
将Ingress Gateway服务从LoadBalancer类型更改为NodePort
Istio为Kubernetes提供了许多自定义资源定义(CRD)。它们帮助我们从kubectl操纵虚拟服务,规则,网关和其他特定于Istio的对象。让我们在部署实际服务网格之前安装CRD。1
kubectl apply -f install/kubernetes/helm/istio/templates/crds.yaml
查看安装的CRD:1
kubectl get CustomResourceDefinition
Kubernetes中安装Istio核心组件1
kubectl apply -f install / kubernetes / istio-demo.yaml
1 | kubectl get svc -n istio-system -l istio=ingressgateway |
*当前EXTERNAL-IP处于pending状态,为了使得可以从外部访问,修改istio-ingressgateway这个Service的externalIps,所以这个指定一个192.168
.19.223作为externalIp。也是可以设置NodePort 通过节点的nodeip:PORT访问1
2
3[root@k8s-master istio-1.0.6]# kubectl get svc -n istio-system -l istio=ingressgateway
NAME TYPE CLUSTER-IP EXTERNAL-IP PORT(S) AGE
istio-ingressgateway LoadBalancer 10.102.137.201 192.168.19.223 80:31380/TCP,443:31390/TCP,31400:31400/TCP,15011:31211/TCP,8060:31598/TCP,853:31745/TCP,15030:30600/TCP,15031:30012/TCP 2m21s
验证安装1
2kubectl get svc -n istio-system
kubectl get pod -n istio-system
部署Bookinfo应用自动注入sidecar
kubectl get pod -n istio-system | grep injector
istio-sidecar-injector可以自动将Envoy容器作为sidecar注入到Pod中,Pod所在的namespace包含istio-injection=enabled的Label。1
2
3kubectl label namespace default istio-injection=enabled
kubectl apply -f samples/bookinfo/platform/kube/bookinfo.yaml
kubectl apply -f samples/bookinfo/platform/kube/bookinfo-ingress.yaml
1 | [root@k8s-master istio-1.0.6]# kubectl get pod,svc | grep -vE "tomcat|iperf" |
通过Istio Ingress Gateway暴露Bookinfo应用
创建bookinfo的Gateway和VirtualService:1
2
3
4
5
6
7
8
9
10
11
12
13
14
15
16
17
18
19
20
21
22
23
24
25
26
27
28
29
30
31
32
33
34
35
36
37
38
39
40
41[root@k8s-master istio-1.0.6]# cat samples/bookinfo/networking/bookinfo-gateway.yaml
apiVersion: networking.istio.io/v1alpha3
kind: Gateway
metadata:
name: bookinfo-gateway
spec:
selector:
istio: ingressgateway # use istio default controller
servers:
- port:
number: 80
name: http
protocol: HTTP
hosts:
- "*"
---
apiVersion: networking.istio.io/v1alpha3
kind: VirtualService
metadata:
name: bookinfo
spec:
hosts:
- "*"
gateways:
- bookinfo-gateway #对应上面的网关名称
http:
- match:
- uri:
exact: /productpage
- uri:
exact: /login
- uri:
exact: /logout
- uri:
prefix: /api/v1/products
route:
- destination:
host: productpage
port:
number: 9080
kubectl apply -f samples/bookinfo/networking/bookinfo-gateway.yaml
1 | [root@k8s-master istio-1.0.6]# kubectl get gateway |
访问http://192.168.19.223/productpage
临时映射grafana端口1
kubectl -n istio-system port-forward --address 0.0.0.0 $(kubectl -n istio-system get pod -l app=grafana -o jsonpath='{.items[0].metadata.name}') 3333:3000 &
使用 Istio 网关配置 Ingress暴露grafana服务
Ingress Gateway描述了在网格边缘操作的负载平衡器,用于接收传入的 HTTP/TCP 连接。它配置暴露的端口,协议等,但与 Kubernetes Ingress Resources 不同,它不包括任何流量路由配置。流入流量的流量路由使用 Istio 路由规则进行配置,与内部服务请求完全相同。
创建一个 Istio Gateway:
1 | cat <<EOF | istioctl create -f - |
为通过 Gateway 进入的流量配置路由创建VirtualService:1
2
3
4
5
6
7
8
9
10
11
12
13
14
15
16
17
18
19
20
21cat <<EOF | istioctl create -f -
apiVersion: networking.istio.io/v1alpha3
kind: VirtualService
metadata:
name: grafana
namespace: istio-system
spec:
hosts:
- "grafana.idcsec.com"
gateways:
- grafana-gateway
http:
- match:
- uri:
prefix: /
route:
- destination:
port:
number: 3000
host: grafana
EOF
使用浏览器访问 Ingress 服务
在浏览器中输入 grafana 服务的地址是不会生效的,这是因为因为我们没有办法让浏览器像 curl 一样装作访问grafana.idcse.com。因为有正常配置的主机和 DNS 记录,这种做法就能够成功了——只要简单的在浏览器中访问由域名构成的 URL 即可,例如 http://grafana.idcse.com/。
要解决此问题以进行简单的测试和演示,我们可以在 Gateway 和 VirutualService 配置中为hosts:使用通配符值 *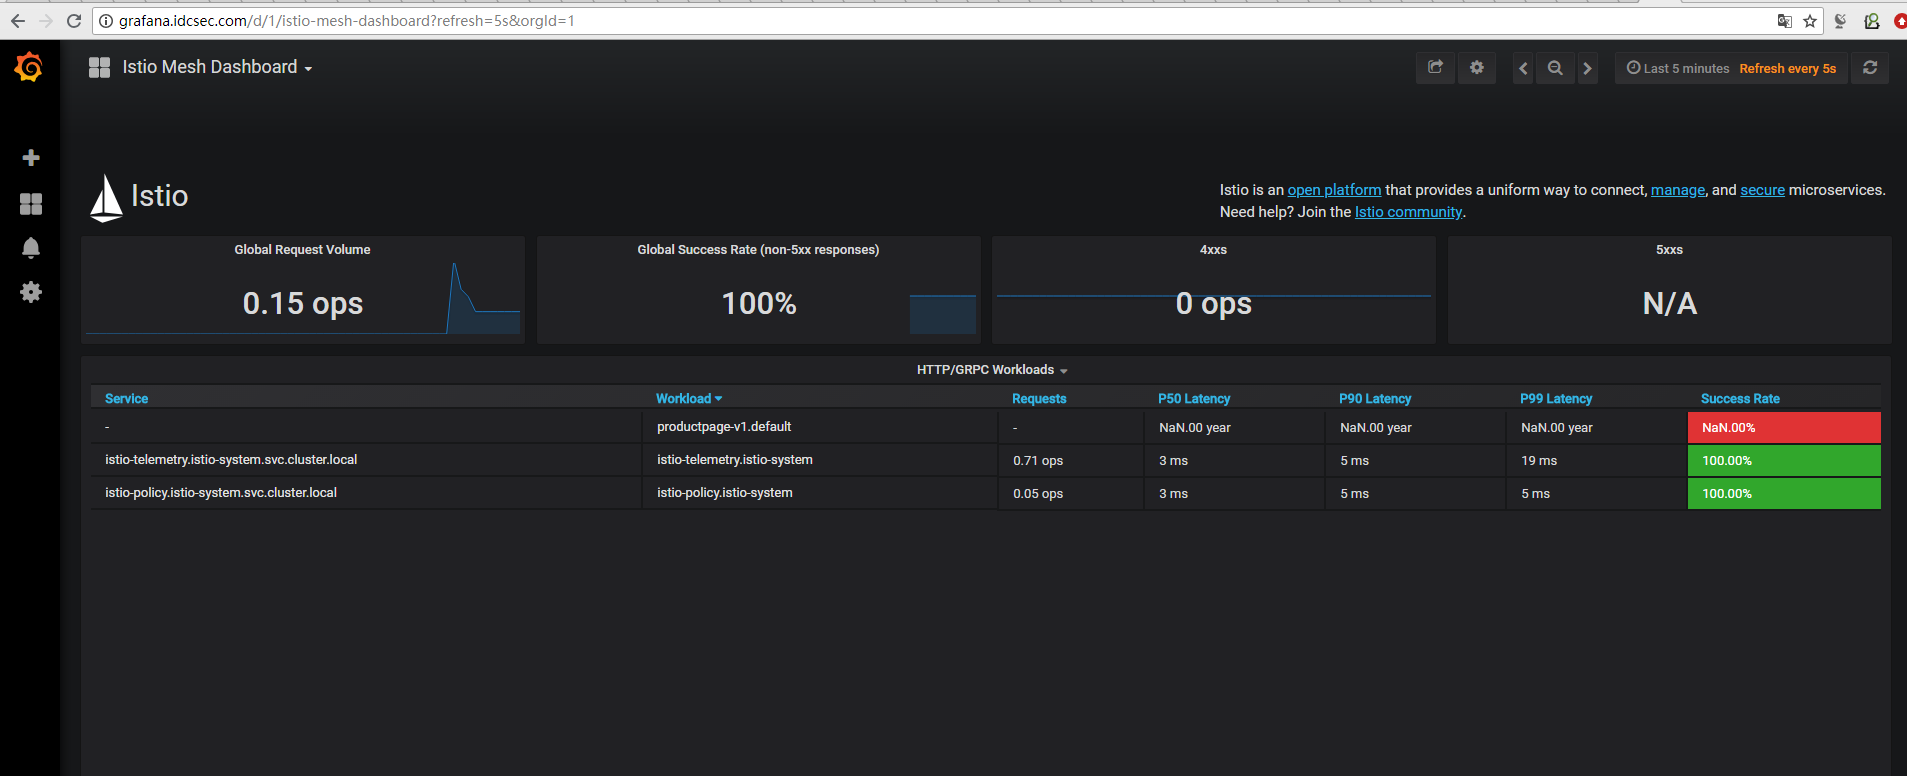
删除 Gateway 和 VirtualService,并关闭 httpbin 服务:
·····
$istioctl delete gateway grafana-gateway
$ istioctl delete virtualservice grafana
····
卸载Istio
···
kubectl delete -f install/kubernetes/istio-demo.yaml
kubectl delete -f install/kubernetes/helm/istio/templates/crds.yaml -n istio-system
···