节点规划
master 192.168.19.222
node1 192.168.19.223
node2 192.168.19.224
软件版本
操作系统:CentOS Linux release7 4.4.174-1.el7.elrepo.x86_64
Docker版本:18.06.2-ce
kubernetes版本:1.13.3
环境准备
配置SSH免密登录
关闭所有节点防火墙
1 | [root@k8s-master ~]# service firewalld stop && systemctl disable firewalld |
关闭所有节点selinux
1 | [root@k8s-master ~]# setenforce 0 |
设置所有节点/etc/hosts文件
1 | [root@k8s-master ~]# cat /etc/hosts |
关闭所有节点swap
1 | [root@k8s-master ~]# swapoff -a |
所有节点参数设置
1 | [root@k8s-master ~]# cat > /etc/sysctl.d/k8s.conf <<EOF |
4.所有节点安装Docker
安装docker的yum源:1
2
3
4
5
6
7
8
9
10
11
12
13
14
15
16
17
18
19
20
21
22yum install -y yum-utils device-mapper-persistent-data lvm2
yum-config-manager \
--add-repo \
https://download.docker.com/linux/centos/docker-ce.repo
查看最新的Docker版本:
[root@k8s-master ~]# yum list docker-ce.x86_64 --showduplicates |sort -r
已加载插件:fastestmirror
已安装的软件包
可安装的软件包
* updates: centos.ustc.edu.cn
Loading mirror speeds from cached hostfile
* extras: centos.ustc.edu.cn
* elrepo: mirrors.tuna.tsinghua.edu.cn
docker-ce.x86_64 3:18.09.2-3.el7 docker-ce-stable
docker-ce.x86_64 3:18.09.1-3.el7 docker-ce-stable
docker-ce.x86_64 3:18.09.0-3.el7 docker-ce-stable
docker-ce.x86_64 18.06.2.ce-3.el7 docker-ce-stable
docker-ce.x86_64 18.06.2.ce-3.el7 @docker-ce-stable
docker-ce.x86_64 18.06.1.ce-3.el7 docker-ce-stable
docker-ce.x86_64 18.06.0.ce-3.el7 docker-ce-stable
docker-ce.x86_64 18.03.1.ce-1.el7.centos docker-ce-stable
docker-ce.x86_64 18.03.0.ce-1.el7.centos docker-ce-stable
在各节点安装docker的18.06.2.ce-3.el7版本1
2
3[root@k8s-master ~]# yum install -y --setopt=obsoletes=0 \
docker-ce-18.06.2.ce-3.el7
[root@k8s-master ~]# systemctl start docker && systemctl enable docker
配置kubernetes阿里源
1 | [root@k8s-master ~]# cat>>/etc/yum.repos.d/kubrenetes.repo<<EOF |
如果使用google镜像站需要翻墙
https://kubernetes.io/docs/setup/independent/install-kubeadm/1
2
3
4
5
6
7
8
9
10cat <<EOF > /etc/yum.repos.d/kubernetes.repo
[kubernetes]
name=Kubernetes
baseurl=https://packages.cloud.google.com/yum/repos/kubernetes-el7-x86_64
enabled=1
gpgcheck=1
repo_gpgcheck=1
gpgkey=https://packages.cloud.google.com/yum/doc/yum-key.gpg https://packages.cloud.google.com/yum/doc/rpm-package-key.gpg
exclude=kube*
EOF
所有节点安装kubelet kubeadm kubectl包
1 | [root@k8s-master ~]# yum install -y kubelet kubeadm kubectl |
Docker获取kubernetes组件镜像
1 | cat <<EOF > /tmp/get-images.sh |
在Master节点初始化kubernetes集群
1 | [root@k8s-master ]# kubeadm init --kubernetes-version=v1.13.3 --apiserver-advertise-address 192.168.19.222 --pod-network-cidr=10.244.0.0/16 |
按照提示执行配置kubectl配置
1 | mkdir -p $HOME/.kube |
查看一下集群状态1
kubectl get cs
将此节点加入集群,在node1和node22节点执行命令
1 | kubeadm join 192.168.19.222:6443 --token glv963.q0y5srs7s7qbna4y --discovery-token-ca-cert-hash sha256:3013d8f7b0cd16f3d3514031b6459851f047e8f0318d84e8515894198986936e |
配置网络calico3.4
https://docs.projectcalico.org/v3.4/getting-started/kubernetes/
https://docs.projectcalico.org/v3.4/getting-started/kubernetes/installation/calico
https://kubernetes.io/docs/setup/independent/create-cluster-kubeadm/
CNI插件已启用
Calico作为CNI插件安装。必须通过传递–network-plugin=cni参数将kubelet配置为使用CNI网络。(在kubeadm上,这是默认设置。)
使用以下命令安装etcd实例。1
2
3
4
5
6kubectl apply -f \
https://docs.projectcalico.org/v3.4/getting-started/kubernetes/installation/hosted/etcd.yaml
您应该看到以下输出。
daemonset.extensions/calico-etcd created
service/calico-etcd created
kubectl get endpoints --all-namespaces
下载etcd的Calico网络清单
在使用kubeadm部署时,Calico并没有使用kubeadm在Kubernetes master中部署的etcd服务,而是创建了一个Calico自己使用的etcd pod,服务地址为 http://10.96.232.136:66661
2
3[root@k8s-master]#curl \
> https://docs.projectcalico.org/v3.4/getting-started/kubernetes/installation/hosted/calico.yaml \
> -O
由于我的podcidr和官方默认不一样所以需要修改,修改etcdendpoints1
2
3POD_CIDR="10.244.0.0/16" \
sed -i -e "s?192.168.0.0/16?$POD_CIDR?g" calico.yaml
kubectl apply -f calico.yaml
kubeadm init 并且使用该标志指定的CIDR必须与Calico的IP池匹配。在Calico的清单中配置的默认IP池是192.168.0.0/16
在使用kubeadm部署时,Calico并没有使用kubeadm在Kubernetes master中部署的etcd服务,而是创建了一个Calico自己使用的etcd pod,服务地址为 http://10.96.232.136:6666
查看Pods是否正常1
2[root@k8s-master]# kubectl get pods --all-namespaces
[root@k8s-master]# kubectl get node
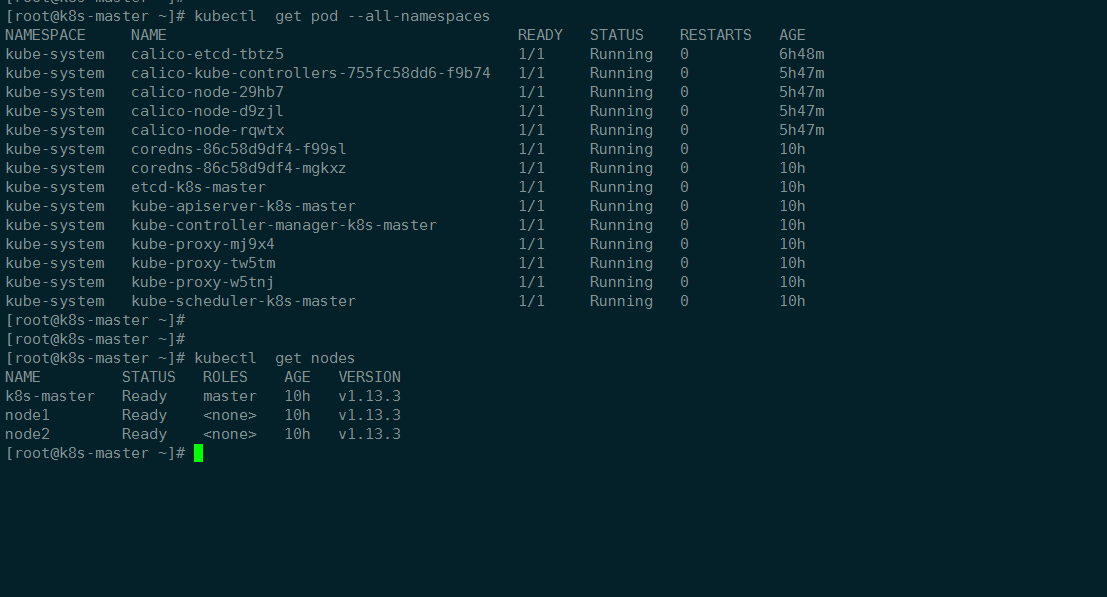
到这里kubernetes集群基本就完成了
token使用命令查看(24小时有效)
查看token Master上执行:
[root@k8s-master]# kubeadm token list
重新生成新的token
[root@k8s-master]#kubeadm token create
获取ca证书sha256编码hash值
[root@k8s-master]#openssl x509 -pubkey -in /etc/kubernetes/pki/ca.crt | openssl rsa -pubin -outform der 2>/dev/null | openssl dgst -sha256 -hex | sed ‘s/^.* //‘
可选
kube-proxy开启ipvs
kube-proxy开启ipvs需要加载的内核模块,在所以运行kube-proxy节点执行1
2
3
4
5
6
7
8
9cat > /etc/sysconfig/modules/ipvs.modules <<EOF
#!/bin/bash
modprobe -- ip_vs
modprobe -- ip_vs_rr
modprobe -- ip_vs_wrr
modprobe -- ip_vs_sh
modprobe -- nf_conntrack_ipv4
EOF
chmod 755 /etc/sysconfig/modules/ipvs.modules && bash /etc/sysconfig/modules/ipvs.modules && lsmod | grep -e ip_vs -e nf_conntrack_ipv4
1 | kubectl edit cm kube-proxy -n kube-system |
清理集群
移除node2这个Node执行下面的命令:1
2
3
4
5
6master执行:
kubectl drain node2 --delete-local-data --force --ignore-daemonsets
kubectl delete node node2
在node2上面执行:
kubeadm reset
rm -rf /var/lib/cni/
安装dashboard
pull镜像1
2
3docker pull registry.cn-qingdao.aliyuncs.com/wangxiaoke/kubernetes-dashboard-amd64:v1.10.0
docker tag registry.cn-qingdao.aliyuncs.com/wangxiaoke/kubernetes-dashboard-amd64:v1.10.0 k8s.gcr.io/kubernetes-dashboard-amd64:v1.10.0
docker image rm registry.cn-qingdao.aliyuncs.com/wangxiaoke/kubernetes-dashboard-amd64:v1.10.0
dashboard.yaml1
2
3
4
5
6
7
8
9
10
11
12
13
14
15
16
17
18
19
20
21
22
23
24
25
26
27
28
29
30
31
32
33
34
35
36
37
38
39
40
41
42
43
44
45
46
47
48
49
50
51
52
53
54
55
56
57
58
59
60
61
62
63
64
65
66
67
68
69
70
71
72
73
74
75
76
77
78
79
80
81
82
83
84
85
86
87
88
89
90
91
92
93
94
95
96
97
98
99
100
101
102
103
104
105
106
107
108
109
110
111
112
113
114
115
116
117
118
119
120
121
122
123
124
125
126
127
128
129
130
131
132
133
134
135
136
137
138
139
140
141
142
143
144
145
146
147
148
149
150
151
152
153
154
155
156
157
158
159
160
161
162
163
164
165
166# Copyright 2017 The Kubernetes Authors.
#
# Licensed under the Apache License, Version 2.0 (the "License");
# you may not use this file except in compliance with the License.
# You may obtain a copy of the License at
#
# http://www.apache.org/licenses/LICENSE-2.0
#
# Unless required by applicable law or agreed to in writing, software
# distributed under the License is distributed on an "AS IS" BASIS,
# WITHOUT WARRANTIES OR CONDITIONS OF ANY KIND, either express or implied.
# See the License for the specific language governing permissions and
# limitations under the License.
# ------------------- Dashboard Secret ------------------- #
apiVersion: v1
kind: Secret
metadata:
labels:
k8s-app: kubernetes-dashboard
name: kubernetes-dashboard-certs
namespace: kube-system
type: Opaque
---
# ------------------- Dashboard Service Account ------------------- #
apiVersion: v1
kind: ServiceAccount
metadata:
labels:
k8s-app: kubernetes-dashboard
name: kubernetes-dashboard
namespace: kube-system
---
# ------------------- Dashboard Role & Role Binding ------------------- #
kind: Role
apiVersion: rbac.authorization.k8s.io/v1
metadata:
name: kubernetes-dashboard-minimal
namespace: kube-system
rules:
# Allow Dashboard to create 'kubernetes-dashboard-key-holder' secret.
- apiGroups: [""]
resources: ["secrets"]
verbs: ["create"]
# Allow Dashboard to create 'kubernetes-dashboard-settings' config map.
- apiGroups: [""]
resources: ["configmaps"]
verbs: ["create"]
# Allow Dashboard to get, update and delete Dashboard exclusive secrets.
- apiGroups: [""]
resources: ["secrets"]
resourceNames: ["kubernetes-dashboard-key-holder", "kubernetes-dashboard-certs"]
verbs: ["get", "update", "delete"]
# Allow Dashboard to get and update 'kubernetes-dashboard-settings' config map.
- apiGroups: [""]
resources: ["configmaps"]
resourceNames: ["kubernetes-dashboard-settings"]
verbs: ["get", "update"]
# Allow Dashboard to get metrics from heapster.
- apiGroups: [""]
resources: ["services"]
resourceNames: ["heapster"]
verbs: ["proxy"]
- apiGroups: [""]
resources: ["services/proxy"]
resourceNames: ["heapster", "http:heapster:", "https:heapster:"]
verbs: ["get"]
---
apiVersion: rbac.authorization.k8s.io/v1
kind: RoleBinding
metadata:
name: kubernetes-dashboard-minimal
namespace: kube-system
roleRef:
apiGroup: rbac.authorization.k8s.io
kind: Role
name: kubernetes-dashboard-minimal
subjects:
- kind: ServiceAccount
name: kubernetes-dashboard
namespace: kube-system
---
# ------------------- Dashboard Deployment ------------------- #
kind: Deployment
apiVersion: apps/v1beta2
metadata:
labels:
k8s-app: kubernetes-dashboard
name: kubernetes-dashboard
namespace: kube-system
spec:
replicas: 1
revisionHistoryLimit: 10
selector:
matchLabels:
k8s-app: kubernetes-dashboard
template:
metadata:
labels:
k8s-app: kubernetes-dashboard
spec:
containers:
- name: kubernetes-dashboard
image: k8s.gcr.io/kubernetes-dashboard-amd64:v1.10.0
ports:
- containerPort: 8443
protocol: TCP
args:
- --auto-generate-certificates
- --token-ttl=5400
# Uncomment the following line to manually specify Kubernetes API server Host
# If not specified, Dashboard will attempt to auto discover the API server and connect
# to it. Uncomment only if the default does not work.
# - --apiserver-host=http://my-address:port
volumeMounts:
- name: kubernetes-dashboard-certs
mountPath: /certs
# Create on-disk volume to store exec logs
- mountPath: /tmp
name: tmp-volume
livenessProbe:
httpGet:
scheme: HTTPS
path: /
port: 8443
initialDelaySeconds: 30
timeoutSeconds: 30
volumes:
- name: kubernetes-dashboard-certs
hostPath:
path: /home/share/certs
type: Directory
- name: tmp-volume
emptyDir: {}
serviceAccountName: kubernetes-dashboard
# Comment the following tolerations if Dashboard must not be deployed on master
tolerations:
- key: node-role.kubernetes.io/master
effect: NoSchedule
---
# ------------------- Dashboard Service ------------------- #
kind: Service
apiVersion: v1
metadata:
labels:
k8s-app: kubernetes-dashboard
name: kubernetes-dashboard
namespace: kube-system
spec:
ports:
- port: 443
targetPort: 8443
nodePort: 31234
selector:
k8s-app: kubernetes-dashboard
type: NodePort